Part 4: Battle of Khylo PvP Strategy and Rotations
Battle of Khylo is another fairly small sized map, similar to Forest of Niflhel, which has respawns close to the Home node of each team. However, it does not include any bosses and is a pure conquest map.
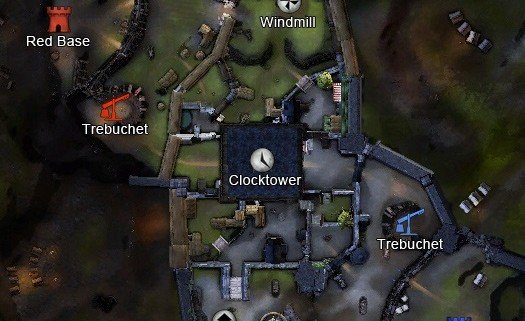
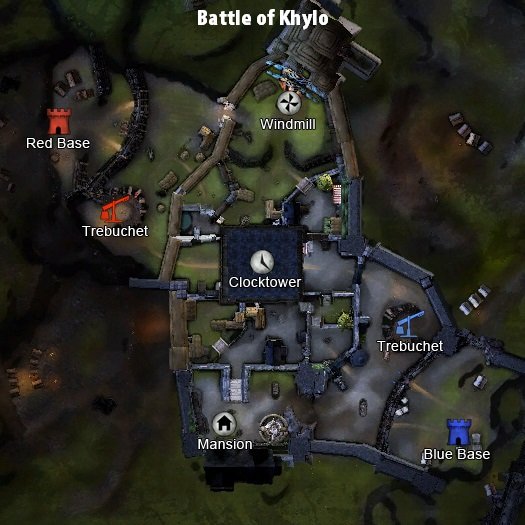
The only side-objective is trebuchet, which is only really worth firing at the middle-point, Clocktower – and that’s if it even hits.
I find in solo queue you should only use the trebuchet in rare cases. There’s a a time and place for it, and that’s because it catches a lot of people off-guard.
You should be aware of Khylo’s z-axis and take advantage of it on the mid-point. I also want to mention that much of this map is similarly played to how Forest of Niflhel is played, but it’s slightly harder to snowball due to the giant Clocktower in the middle obstructing your mobility.
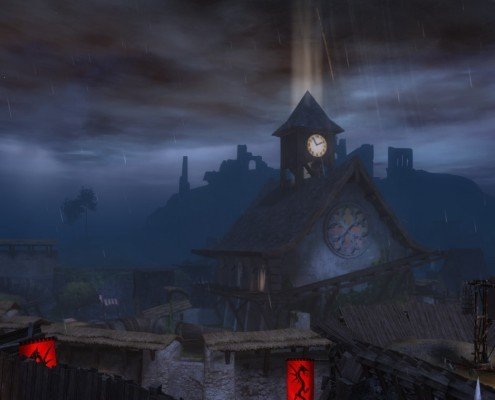
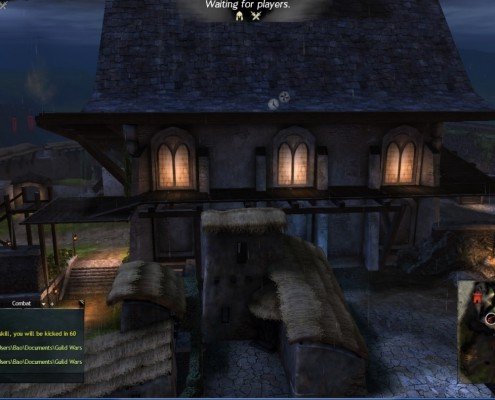
Here are 3 pictures which briefly illustrate the top, middle, and bottom levels of the Clocktower:
I’m not actually going to go incredibly in-depth with port places on the inside and outside of Clocktower – you can search a Youtube video for that. I know Supcutie has a really good one.
Anyways, I want to talk more about fighting on the point itself.
Clocktower is an extremely important point on Khylo for the fact that it has direct control to the side nodes, Mansion and Windmill, which are both open-field nodes.
This is important because, for most classes, fighting in open-field is different than fighting with Line of Sight (LoS). If you play something like Necromancer it can be incredibly difficult to position when you’re just in open-field. Therefore, whether it benefits you or does not benefit you controlling Clocktower is crucial, just like The Keep is important for Forest.
Simply put, when fighting on Clocktower you should never stand on the point or you’re going to end up dying. In fact, that goes for all capture-points. However, if you ever get in trouble, porting to the top, running to the bottom, or using the rafters on Clocktower are all incredibly useful.
Take note that you should almost never be in a bad position since there are so many places to run around on this map.
Classes like Necro, Dragonhunter, and Engineer are huge on Mid node. The point acts as a wall of protection as well as being small enough for all 3 classes to be able to AoE-down the entire node.
Thank you so much for reading this guide if you’ve read through all 4 parts. You can follow my social accounts if you want to get notified when I publish more content like this. I will probably make a video version of ranked PvP Legendary-tier gameplay and commentate through it, so be on the lookout for that!
I may expand on this guide further in the future. In the meantime, I hope this was helpful for everyone. Thanks!
In case you missed any part of my comprehensive Guild Wars 2 PvP Guide, start from the beginning!
About The Publisher. — Team PZ is a former pro Guild Wars 2 organization and avid contributor to Joingy. As an explanation, it’s a fast-paced site like Omegle or Chatroulette with full reviews of chat topics.
https://teampz.com/wp-content/uploads/2016/03/battle-of-khylo.jpg525525Team PZhttps://teampz.com/wp-content/uploads/2016/03/logo-transparent.pngTeam PZ2016-03-12 08:05:092020-10-17 08:41:06Battle of Khylo - GW2 PvP Guide by Zoose
Part 3: Legacy of the Foefire PvP Strategy and Rotations
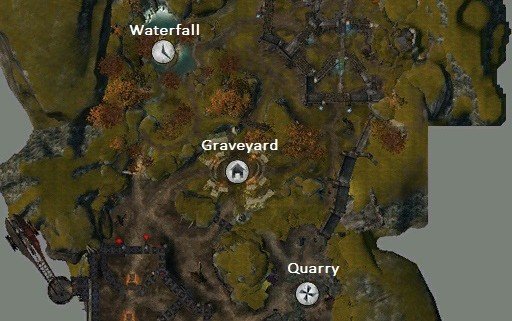
Legacy of the Foefire is a fairly large map, but the points between spawns to each of the nodes are pretty much equal distance.
It should also be noted that Graveyard is the node with the largest circumference on all competitive maps.
Team Guild Lords exist on each side of the map that gives 150 points after breaking down the base door and defeating them.
This makes Legacy a balanced map that does not favor any single composition or play-style too heavily. However, since Graveyard is so big, oftentimes the first team to cap it will have a huge advantage due to how hard it is to get back.
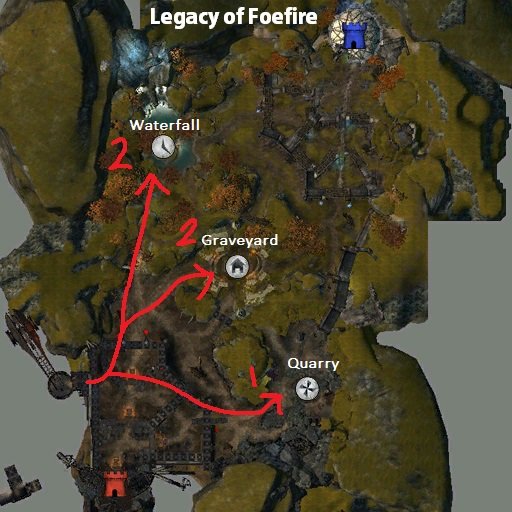
I’ll illustrate a different opening split and explain the nuances of Legacy that are different from Forest of Niflhel, as well as add some class samples.
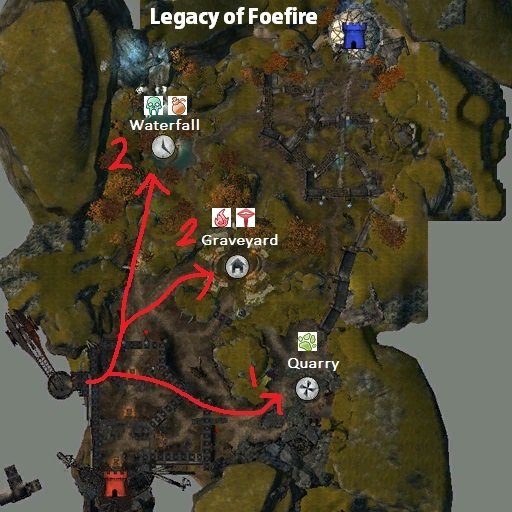
Let’s go with a 1-2-2 split this time:
The first thing to note that since this is a map where both teams are spawning from a base gate that has to be destroyed, it is much safer to send people to Waterfall and Quarry either alone or as a pair.
The reason for this is if Quarry is your Home node and that person gets outnumbered he can run away into his base and go to Graveyard. The players going to the Waterfall can also take favorable fights or go to Graveyard if they do not want to outnumber someone.
This gives you more options to win depending on how you want to play.
Example Scenario:
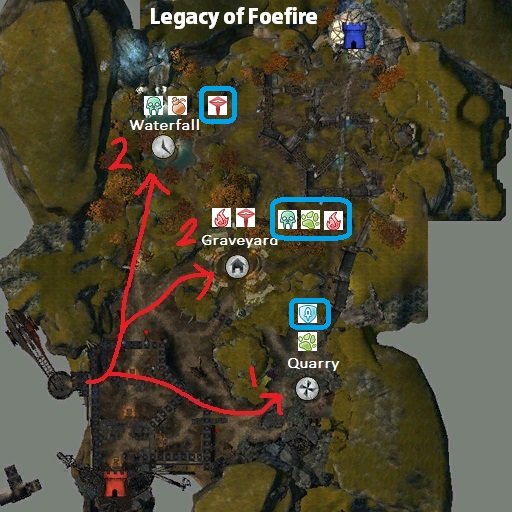
So let’s say this is your team composition:
And you split the following way:
Let’s say this is Blue Team’s comp:
And they split in a 1-3-1 fashion:
Blue Team has an advantage on Graveyard while having a disadvantage on Waterfall, temporarily. This type of split however, creates a position in which someone from Red Team Waterfall has to go help mid-point or risk losing it.
You do not want to lose Mid on Legacy.
Another thing to note is Blue Team’s Dragonhunter has managed to avoid both the Engineer and Elementalist by going to Quarry to fight Red Team’s Druid.
This creates a situation where the matchup for Quarry is fairly equal giving either team a chance to win the node.
Blue Team’s Revenant has the toughest job since he has to live the 1v2, but on a map like Legacy he could easily run back into his base if he needed to survive.
Once 1 person from Red Team leaves Waterfall he can then push back in to have a 1v1. Let’s discuss each person’s job on each team and how it will affect the map.
In-Depth Analysis of the Classes in This Scenario:
Red Team:
– A Necromancer is far too strong to not be in a team fight. He should leave the Engineer to fight 1v1 at far and go Mid to try to help his team win the 3v3. A Necro should only hold the node if there’s something his team can’t 1v1 or if that’s your most fitting play-style.
– Revenant is the most durable DPS class with the ability to dodge like an Sword/Dagger Thief with the added bonus of having more blocks. Revenant’s goal should be dodging the Necro’s marks since that’s the main thing that will kill you in addition to blocking scepter attacks. Playing defensive when outnumbered is key until you receive the help of someone from Waterfall. Revenants should only hold nodes if they are good duelists.
– The Engineer can choose to fight 1v1 or go to Mid, but since you get destroyed by Necros it will be wise to take the fight at Waterfall and let the Necro go to Graveyard. Depending on your play-style after you win a node you can choose to hold it or roam.
– Just win your 1v1 vs. the Dragonhunter so you can have bragging rights. You’re probably the most suited to hold a node on this team after you win one.
– Heal your teammates, provide the amazing support that Elementalist’s can give out and focus on winning the 3v3 at Mid. After that you can choose to roam to heal other people or hold nodes if you win them. Elementalist’s can’t 1v1 anything on support builds and should never do so unless you can kill it 100% or if you own the node.
Blue Team:
– You have the man advantage Mid. Your job should be to destroy whatever is there as quick as possible. If you get into a mirror matchup vs. another Necromancer don’t blow your plague signet too soon. That’s how you die. Your team has decent damage even without you in a team fight, so holding a node 1v1 isn’t bad, but it’s probably preferably you get the first kill and try to snowball other nodes.
– You’re being 1v2’d right off the start, lucky for you there’s a gate that you can run through to save your life if things go bad. DO NOT DIE at all costs because you can always push back into Waterfall and duel the person there or choose to go to Mid right off the start and outnumber 4v2. If you choose this option you’ll most likely be outnumbering 4v3 since someone from Waterfall will come. If you can wipe their team to get the point this will be extremely worth it, otherwise, just 1v1 whoever is on Waterfall to try to win it if you’re a good duelist.
– If you run the trait that roots on CC then you can help the Necro and Elementalist kill the 2 people Mid extremely quickly. Be aggressive and be ready to daze when the body goes down. If things to bad you’re the primary rez-bot in this fight, so don’t forget to look at your teammates HP bars. If you run Search and Rescue it could change the fight, just be ready to use it as soon as a teammate drops.
– You’re outnumbering Mid. Play aggressive and try to interrupt your enemies with your CC and shocking aura. Air Overload is your friend in aggressive scenarios. If it becomes a big even team fight look to keep your teammates alive by giving them support. You’ll likely want to roam into a team fight every chance you get. Elementalist’s can’t 1v1 anything on support builds and should never do so unless you can kill it 100% OR if you own the node.
– Dazes wreck Druids. This should be a straight 1v1 without any interference, if there is then you should be able to get out and live by running on the ledge that is un-portable on Quarry. Rune of the Trapper is overpowered on Guardian and can help you turn and burn enemies or run away with Superspeed + stealth. Look to never hold nodes as this class as it’s primarily a DPS Roamer unless you know a certain few matchups VERY well and can win them.
Legacy of the Foefire Conclusion:
It’s a balanced map that rewards wins on every node fairly evenly. Graveyard is obviously the most important node, but you can also win on side nodes on a map like Legacy in solo queue – especially if Mid is held neutralized.
Pushing into Far or Home are both acceptable for snowball circumstances if Mid is too difficult to win. Watch for the 350-point lord rushes. This map has a lot to do with which team gets to 350 points first for Lord pressure. Take advantage of your base gates to survive from home-point pressure.
But wait, there’s more!
Continue reading my comprehensive Guild Wars 2 PvP guide:
About The Publisher. — Team PZ is a former pro Guild Wars 2 organization and avid contributor to Joingy. As an explanation, it’s a fast-paced site like Omegle or Chatroulette with full reviews of chat topics.
https://teampz.com/wp-content/uploads/2016/03/legacy-of-foefire-1.jpg512512Team PZhttps://teampz.com/wp-content/uploads/2016/03/logo-transparent.pngTeam PZ2016-03-12 08:05:032020-10-17 08:39:52Legacy of the Foefire - GW2 PvP Guide by Zoose
Part 2: Forest of Niflhel PvP Strategy and Rotations
After you’ve read my post on PvP Tiers, Team Comps & your Win Condition and you have an idea of what role you want to play, let’s go over the main competitive maps and how to rotate on each one.
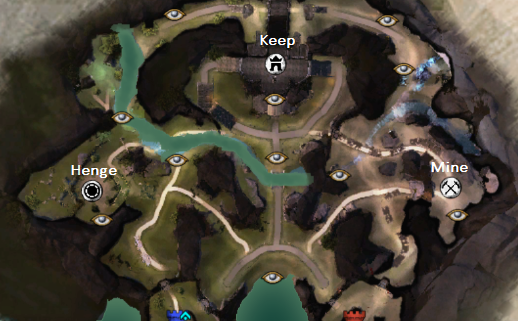
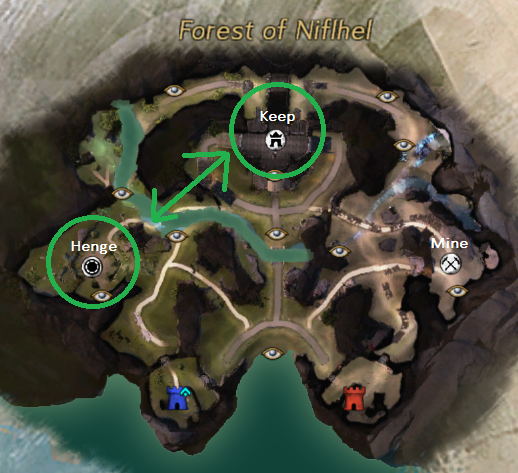
Take a look at the Forest of Niflhel map:
Forest of Niflhel is a small sized map with a 25 point secondary objective boss on each side (Chieftain Blue and Svanir Red).
Forest is the best map for DPS-oriented team compositions.
The reason for this is because the map is so small, after you get a kill you can continue to get more kills and other cap points quickly before your enemies can respawn to help, creating a snowball effect. However, it does not favor dueling on the Far node as much since the enemy respawn is so close
Kills on home-point and Middle node are heavily rewarded, while far-point is more of a distraction than a priority.
Forest of Niflhel Strategy
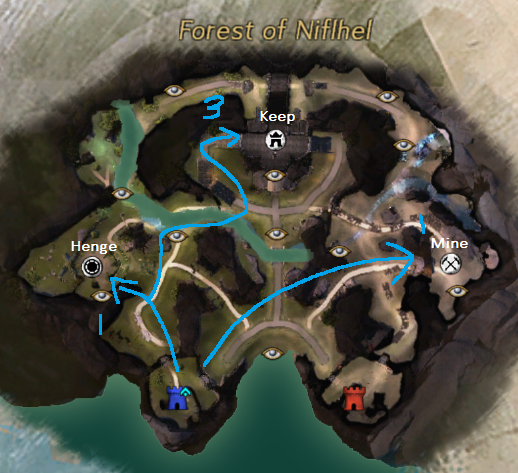
Let’s say at the start of the game you are on Blue team and your Forest split is 1-3-1.
The first thing to notice is that the player that is going to far-point (Mine) has the most dangerous and almost equally long path to Far as mid-point (Keep).
Typically, the player going to Mine is going to take a lot of aggro and may not be able to make it there safely. Therefore, the job of the player who went to Mine should be to distract if he takes a 2v1 or more so that Keep and home-point (Henge) can win.
Alternatively, if the person at far-point wins the fight the best options in each scenario should be:
– Neutralize the point and go Mid if a fight is still ongoing
– Fully cap the point and take the next 1v1, but leave if it becomes 2v1
– Neutralize the point and go to Home if there is a big and close fight
– Kill Svanir if nothing else is going on in the map
As you can see when playing solo queue even if there isn’t communication, the map can tell you a lot of information to play off of.
So looking at the map consistently is INCREDIBLY important!
Team Fighting on Forest
Now what if you’re one of the 3 going to Keep?
Then your job is probably to be in a team fight, properly position, and play it out until you win. That will come with mechanical practice and positioning that you will be able to improve on the more you play.
The scenarios at Keep that you will most likely be in are:
– A 3v3 or 4v4 team fight. If you this is your strength, then this is where you should be.
– You are outnumbering Keep. You can either choose to wipe the enemy team there and go to another point, or match the numbers and play the skirmish game.
– You are outnumbered Keep. Your job should be to live as long as possible without dying. If you do die, then it’s important to die on the cap point in order to keep it neutralized.
– In the case where you win, it’s better to help home-point win next instead of pushing into Far node on Forest.
If your strength lies in team fighting, then you go where the team fight is. This is normally Mid, but not always. Continue to do that for the rest of the game, and keep attempting to put yourself in favorable matchups.
The person that holds Henge or Home in solo queue usually has either the easiest job or the hardest job. However, on a map like Forest, even if you die at home-point it isn’t as important as losing Keep because of how small the map is.
If we look back at the map above, the point from spawn into Henge is the closest on the map by a long shot.
So in theory, the person that is sent Home on Forest could be a really tanky class or just a good duelist if that’s the role you want to take.
The most important part of home-point is if 5 people are shown on the map you SHOULD NEVER sit on the point doing nothing. This happens all the time, and it’s infuriating and makes the game a legit 5v4.
Don’t do this on any node at any time. Look at the map!
Forest in a Nutshell:
Focus on kills and not points in order to snowball Mid and Home. Any Far node assaulter is just a distraction for Mid and Home to win. Home-point can be stalled out, have a duelist on it, or a sustained 2v2, etc.
If at any point in time you die, and this goes for any map, the first thing you should do is look at the map and go where you are needed.
Do NOT go into already losing fights.
Look at your teammate’s HP bars and the map for enemy down-states.
But wait, there’s more!
Continue reading my comprehensive Guild Wars 2 PvP guide:
About The Publisher. — Team PZ is a former pro Guild Wars 2 organization and avid contributor to Joingy. As an explanation, it’s a fast-paced site like Omegle or Chatroulette with full reviews of chat topics.
https://teampz.com/wp-content/uploads/2016/03/forest-of-niflhel.png473518Team PZhttps://teampz.com/wp-content/uploads/2016/03/logo-transparent.pngTeam PZ2016-03-12 08:04:542020-10-17 08:37:59Forest of Niflhel - GW2 PvP Guide by Zoose
In this guide I’ll be covering tactics and strategies that I’ve experienced over hundreds of hours of solo play.
You should take note that this isn’t a guide for just one class, one spec or one role.
From the solo queue rookie to the seasoned veterans – I’ll be covering several roles that will enable anyone to achieve success! You can feel free to skip around to parts of my guide that pertain to you, but I recommend at least skimming through the whole guide – you might even learn something cool!
This is Part 1 of a 4-Part Guide I’ve published on Guild Wars 2 PvP & Solo Queue.
I highly suggest checking out the other parts of this series:
Part 1: PvP Tier List, Team Compositions and Winning
So you queue up, get into a game, and you’re looking to win.
Many players spend their 90-second pre-game sitting there waiting for the match to start, but that time is valuable and can be spent analyzing team compositions. Press ‘B’ to bring up the scoreboard and look at both your team and the enemy team’s composition.
You want to think about what the best role you can play for that game could be. If you play multiple classes, then this becomes incredibly useful. However, if you don’t multi-class and have mastered your main role, then you can most likely turn yourself into a bruiser, support, or DPS. To help you figure out what you should play, I’ve created a tier list for each role.
Here’s an explanation of the multiple roles that classes can spec into:
DPS – Pure damage and squishy
Bruiser – Tanky DPS
Duelist – 1v1 Oriented & selfish spec
Support – Heavily based around healing or crowd control/utility
Skirmish – 2v2 oriented or small fights across the map
Team Fighting – 3v3 or 4v4 oriented
Next we’re going to go over a comprehensive PvP tier list of the Guild Wars 2 classes. This takes into account every role that a class can play in addition to the overall strength of the class itself.
I’ll list the strength of the role based on the key below:
S-Tier (Overpowered) – The best at what they do.
A-Tier (Strong) – Strong in the right team composition or as a counter.
B-Tier (Mediocre) – Similar to A-Tier, but will rarely ever outperform them.
C-Tier (Weak) – Just plain bad. Don’t play this.
Solo Queue PvP Tier List
Take note that if a role isn’t listed, then it doesn’t fall under that category or it isn’t meta enough.
Support Bruisers (Skirmishing)
S-Tier: ,
A-Tier:
Support Bruisers (Team Fighting)
S-Tier:
A-Tier: ,
DPS
S-Tier: ,
A-Tier: ,
B-Tier: ,
Duelist
S-Tier: ,
A-Tier: , ,
B-Tier:
Overall Carry Potential:
S-Tier: ,
A-Tier: , , ,
B-Tier: ,
C-Tier:
PvP Class Matchups & Notes:
Elementalist
– Good vs. Condition damage, Dragonhunters
– Bad vs. Boon strip or corrupt, high burst damage both power and condition
– Insane healing power with Clerics or Menders amulet
– Vulnerable without Earth 5 (Obsidian Flesh)
– Great team fight utility in auras and heals, small amount of CC
Mesmer
– Good vs. isolated 1v1s against Revenant, Druid, Necro, Elementalist, Thief
– Bad vs. Dragonhunter
– Incredible mobility and game changing utilities with blink, portal, Moa/Time Warp/Gravity Well
– Invulnerable frames that allow you to do damage during it
– Ability to make a game 5v4 with portal if the enemy does not have a Mesmer
Necromancer
– Good vs. Literally every class in a 1v1, great AoE in team fight, busted class right now
– Bad vs. focus fire due to low stability access and few escapes
– Excels in 1v1 and 2v2 situations, can also team fight well due to AoE
– Have to use good positioning, make a wrong step and you’ll likely go down
Revenant
– Good vs. all classes that aren’t Necro or Condi-Mesmer
– Bad vs. condition overload due to low condi-clear or good Thieves
– Exceptional ability to live due to chaining dodge rolls, Glint heal, and blocking
– Excels at focusing one target, therefore flexible as a team fight assassin or 1v1 duelist
Dragonhunter
– Good vs. Condi-Mesmer, Thief, Necro
– Bad vs. unblockable spells, Elementalist, Revenant
– Traps give you an ability to play a unique mind game where you can zone your enemy
– Daze and AoE damage on downed bodies is incredibly high
– Longbow is the only good weapon on Dragonhunter unfortunately, so it’s countered by projectiles
Engineer
– Good vs almost every class that isn’t a Necro due to sustain, stealth, or Moa/Rampage
– Gets destroyed by Necro’s
– Another class with incredible utilities such as Slick Shoes, Toss Moa, Rampage/Tornado, and Stealth Gyro
– Hammer has high base damage and provides a good amount of defensive capabilities
– Vulnerable to condition overload and without Elixir S trait
Druid
– Has a fairly winnable matchup vs. everything that’s not Thief or Revenant
– Search and Rescue saves teammates from themselves
– Without Astral Form you’re most likely going to die
– Vulnerable to +1 (Being 2v1’d)
– Has a good bit of healing and sustain, reliance on regeneration
– Has an interesting entangle mechanic that roots for what seems like forever
– Dazes wreck your life which is why Thief counters Druid
Thief
– It’s not supposed to be a 1v1 class, but it can kill Revenants and Druids solo
– Bad vs. everything that will kill you
– Still the fastest class in the game with Shortbow and Shadowstep/Shadowtrap
– Has easiest access to stealth in the game, you can effectively choose to never take a bad engagement
– Stealth = mind games…or uselessness (you decide)
– Excels at +1-ing a fight mostly a 1v1, and excels at porting up and down Z axis heavy maps such as Khylo and Temple
– Dazes wreck your life which is why Thief counters Druid
Warrior
– The only viable warrior build I’ve run into is Condi-Warrior which can be strong in 1v1s
– There are better things than Warrior right now, but you can be the low tier hero like I was once upon a time
PvP Win Conditions
Now that we’ve defined the roles, gone over the matchups and have a tier list to work off we can answer the question,
Why is it important to look at your team comp pre-game?
Because you want to make the best possible team composition for your win condition. This will give you the best chance of winning. Now let’s take it a step further with an example.
Let’s say this is Team A:
And this is Team B:
If we judge this match by the team compositions alone, then Team A has a higher chance of winning than Team B.
I’ll explain why.
Team A has a balanced composition of 2 supports, 2 DPS, and a Revenant.
Revenants can be flexible in the fact that they can also be duelists. They are also the most self-sufficient DPS class, so you are left with 2 supports for 2 DPS, a perfect combo.
If the game ever gets to the point where you have a 2 point cap, your node holders can be flexible as either your duelists (Revenant or Necro) or your supports (Engineer or Elementalist).
You can also choose to focusing on skirmishing, team fighting, or dueling with this team comp, as all options synergize together perfectly. You have a lot of options to win, therefore you have more win conditions.
I’ll talk more about win conditions in a moment.
Team B has a composition that consists of 4 DPS and a Druid.
Two of which are Dragonhunters, which are countered by projectile reflect/destroy from the Elementalist and Engineer.
You would basically have to move 2 of your classes away from 2 of theirs, which in solo queue is close to impossible. Plus, on top of that there is only 1 support for 4 DPS classes.
Example Scenario:
So let’s say you are one of the Dragonhunters on Team B.
How would you make it a better team comp? Well, this is where win conditions come into play.
This is where you identify your own strengths and what you want your win condition to be.
If you multi-class and you’re a good team fighter then look towards picking a support bruiser.
If you are a DPS-oriented player then you can still look to take fights where you can hunt the other Dragonhunter.
You could also look to be a duelist on the side nodes if you’re a really good duelist.
There are a lot of options even within the realm of just that one class.
In solo queue, the only counters that really matter are hard counters, and even then most of the time skill will trump it.
Even if you don’t multi-class, at worst you could turn yourself into a support by being a semi-bunker Guardian. It just really depends on what you’re best at. Pick what you’re best at, get into a comfort zone with it, and always remember what your win condition is.
If you know you’re going to lose fights with an Elementalist in it, then leave and go to another one. If you are the Dragonhunter mirror matchup pro, then go slay their Dragonhunter!
Do those sort of things and play to your strengths.
For me personally, I would just switch to an Elementalist to be a team fight support, or switch to Mesmer to be a duelist and push Far with a portal and make the game 5v4 in my team’s favor.
In Summary
Your win condition will change from game to game, and you might not figure out what it is until after you’ve already lost.
Keep playing more solo queue games and always be looking for a win condition. Over time you’ll begin to understand what you’re doing right and wrong.
Continue reading my comprehensive Guild Wars 2 PvP guide:
About The Publisher. — Team PZ is a former pro Guild Wars 2 organization and avid contributor to Joingy. As an explanation, it’s a fast-paced site like Omegle or Chatroulette with full reviews of chat topics.
https://teampz.com/wp-content/uploads/2016/03/guild-wars-2-pvp-guide.jpg3001023Team PZhttps://teampz.com/wp-content/uploads/2016/03/logo-transparent.pngTeam PZ2016-03-12 08:04:462020-10-17 08:35:19Guide to Winning PvP in Guild Wars 2 by Zoose